


Walker Rebound Diabetic Ossur

- Indications: Plantar foot ulcers and wound prevention
Rebound Diabetic Ossur has proven to be a key factor in foot ulcer treatment and entails reducing pressure of the plantar area in general and the ulcer site in particular. Rebound Diabetic Walker is uniquely designed for effective treatment of plantar foot ulcers, with easy access and re-fitting during wound care, while improving the patient’s mobility during the healing process. Rebound Diabetic Walker has major advantages over diabetic shoes and shoe inserts in its healing effectiveness and over total contact casting due to its ease of use, speed of application and low cost.
Features:
- Effective tri-laminate insole with removable shock-absorbing hexagons that promote ulcer offloading and a Plastazote, heatmoldable top layer that evenly distributes the pressure and minimizes friction.
- Unique pressure relief valve for preventing over-inflation, while balancing compression with customized fit.
- Positioning Portals allow the clinician to check the fit of the walker at the heel bottom, in order to ensure appropriate positioning of the foot in the walker.
- Anatomically designed shell that minimizes shear forces by immobilizing the foot and ankle at 90 degrees while providing protection.
- Flex Edge® technology for relief of pressure points.
- Rocker Bottom outsole for a smooth roll over while allowing for individual natural toe out.
- Soft and breathable, low friction, machine washable liner for hygiene promotion and prevention of infection
- Tamper evident strapping for compliance monitoring.
Contraindications:
This device is not intended for use on patients with chronic Charcot feet with a rocker bottom deformity.
Warnings and Cautions:
The device must be prescribed by a healthcare professional.
-
Weight limit: The patient's maximum weight is 136 kg (300 lbs).
-
Hexplugs should only be removed or altered by a healthcare professional.
-
Wounds under treatment should be monitored closely for maintenance of pressure relief and healing progress.
-
The insole should not be used in conjunction with any other footwear device.
-
In case of emergency, the compliance strap can be cut with scissors for the removal of the device.
-
Before reapplying the device inspect:
– The foot for any rash, sores, new ulcers, or other indications of skin irritation.
– The boot, bladders, and liners for any damage.
-
If the device has become loose or uncomfortable to wear, readjust the straps as necessary and contact your healthcare professional if discomfort is not relieved.
-
This device is only intended for treating or preventing plantar ulcers of the foot.
-
Patient should use caution when walking on slippery or wet surfaces to avoid injury. Do not remove the device unless instructed by a healthcare professional.
GENERAL SAFETY INSTRUCTIONS
The healthcare professional should inform the patient about everything in this document that is required for safe use of this device.
Any serious incident in relation to the device must be reported to the manufacturer and relevant authorities.
The patient should immediately contact a healthcare professional:
-
If there is a change or loss in device functionality, or if the device shows signs of damage or wear hindering its normal functions.
-
If any pain, skin irritation, or unusual reaction occurs with the use of the device.
-
The device is for single patient – multiple use.
FITTING INSTRUCTIONS
Device Application:
1. Open the liner by first unfastening straps and removing the front shell. 2. Cover the patient's wound with an appropriate dressing.
Customization of the Insole:
-
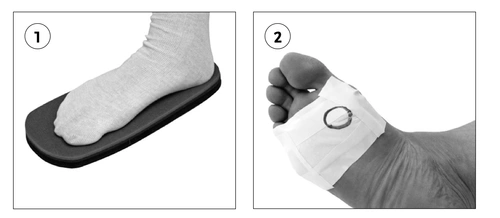
Apply the supplied sock over the patient’s foot/dressing, prior to placing the foot on the heated insole.
-
Do not remove hexplugs prior to heat molding.
-
Pre-heat the oven to 110 °C (230 °F) and then heat the insole for three minutes.
-
Have the patient stand, wearing the sock, on the heated insole for one minute (Fig. 1).
-
Have the patient remove the foot from the insole.
-
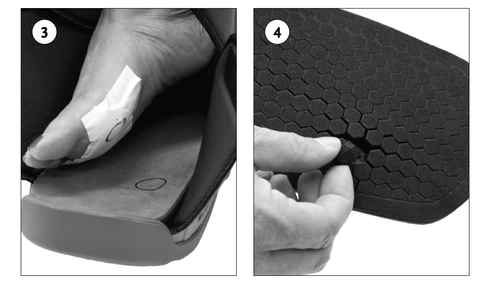
Mark the wound location on the wound dressing with a transferable mark using iodine, lipstick, indelible ink pencil, etc. (Fig. 2).
-
Reposition the insole within the liner, with the heel properly located at the back of the device.
-
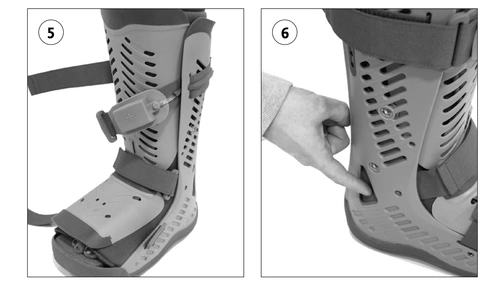
While seated, place the foot inside the device. Ensure the proper location of the patient's foot before transferring the mark to the insole (Fig. 3).
-
Wrap liner securely around foot and leg. Have user bear weight to ensure transfer of relief zone mark.
-
With the patient seated, remove the device. Remove liner and insole. Lightly press on the transferred mark on the insole and remove elevated hexplugs (Fig. 4).
Caution: Do not make the relieving area too large, which may allow the ulcer to contact the bottom of the device while weight-bearing. -
Re-insert the insole into the liner with the hexplugs facing away from the patient's foot. Re-insert the liner and insole into the device.
-
While seated, place the leg into the device.
-
Wrap liner securely around the foot and leg and place the front shell over the foot and leg.
-
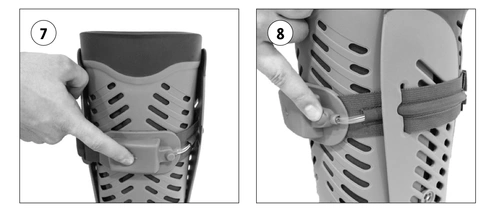
In the following order, fasten the ankle strap, the foot strap, and then the calf strap (Fig. 5). Tighten straps until snug and comfortable. Strap adjustments may be necessary with changes in lower limb volume
-
The lower leg should be kept at a 90° angle with the foot. Use the positioning portals at the back of the device to confirm that the ankle is centered and that the heel is not pressed against the back of the device (Fig. 6).
-
Inflate air chambers by pressing “+” on the air bulb, and deflate by pressing “-“. Inflate or deflate until snug (Fig. 7,8).
Note: The Air System is designed with a feature to prevent over- inflation.
| Size | Shoe size EU | Men's Shoe | Women's Shoe |
|---|---|---|---|
| S | 36 - 39 | 4.5 - 7 | 6 - 8 |
| M | 39,5 - 44 | 7.5 - 10.5 | 8.5 - 11.5 |
| L | 44,5 - 46,5 | 10.5 - 12.5 | 11.5 - 13.5 |
| XL | 47 - 50 | 12.5+ | 13.5+ |